> For the complete documentation index, see [llms.txt](https://developer.magtek.com/llms.txt). Markdown versions of documentation pages are available by appending `.md` to page URLs; this page is available as [Markdown](https://developer.magtek.com/sdks-and-tools/tools-and-utilities/qwantifi-tools-manuals/qwantifi-cloud-dashboard-guide.md).

# QwantiFi Cloud Dashboard (Guide)

The QwantiFi Cloud Dashboard is the fleet console for QwantiFi. It's a browser portal in the Magensa Reseller Portal that lets resellers and administrators see and manage every deployed reader across their merchant network from one place. From the dashboard you can check fleet health at a glance, search and filter your devices, view them on a map, inspect any single reader and send it a command, run actions across many readers at once, watch live device activity, and register new readers.

It's the companion to the [<mark style="color:red;">**QwantiFi Cloud Device Management tool**</mark>](https://developer.magtek.com/sdks-and-tools/tools-and-utilities/qwantifi-cloud-device-management-tool-guide) the dashboard is the fleet-wide view, while the Cloud Device Management tool is the per-device setup step. Registering a reader in the dashboard hands off to that tool — see **Registering a Device**, below. For how the dashboard fits into the wider QwantiFi service, see the [<mark style="color:red;">**QwantiFi Overview**</mark>](https://developer.magtek.com/services/qwantifi/qwantifi-overview).

{% hint style="info" %}
**A Note on "QwantiFi," vs "MQTT":** QwantiFi is built on MQTT, a lightweight, standard messaging protocol for secure device-to-cloud communication. Throughout this documentation we call it "QwantiFi" rather than "MQTT," so you have one consistent name for the service and don't need any prior MQTT knowledge to get started. The underlying protocol is named only where you actually need it, such as in the API reference.
{% endhint %}

## Fleet Health at a Glance

<figure><img src="https://4093728396-files.gitbook.io/~/files/v0/b/gitbook-x-prod.appspot.com/o/spaces%2Fwjbnqo0srzj14AwQMHQM%2Fuploads%2F1FhFfM0cBDyuOLNeroxd%2Fimage.png?alt=media&amp;token=c4aa6bed-dd07-48a4-b7c2-b1e742ec2f28" alt=""><figcaption></figcaption></figure>

Three cards across the top summarize your fleet:

* **Total Devices:** The total number of registered readers in your account.
* **Online:** Readers with a live QwantiFi connection right now (an active connection heartbeat).
* **Policy Blocked:** Readers an administrator has disabled by security policy; these can't be commanded until they're unblocked.

## Connected Devices Directory

<figure><img src="https://4093728396-files.gitbook.io/~/files/v0/b/gitbook-x-prod.appspot.com/o/spaces%2Fwjbnqo0srzj14AwQMHQM%2Fuploads%2FeJbdK2K4352Key2ejjb3%2Fimage.png?alt=media&amp;token=285f6667-431c-409d-8128-3cd9836bc440" alt=""><figcaption></figcaption></figure>

The directory lists every reader deployed across your merchant network. Each row shows the reader's status (Online / Offline / Blocked), serial number, credential state, company or branch, customer code, location, and the date it was first seen.

* **Omni-search:** Filter the list by serial number, customer code, model, city, state, or company.
* **Status filters:** Narrow the list to All, Online, Offline, or Blocked.
* **Select a reader:** Click a serial number to open the device inspector (see *Inspecting a device*). Use the row checkboxes to select one or more readers for bulk actions (see *Bulk actions and the Script Runner*).

## List and Map views

Toggle between two views using the **List** and **Map** buttons at the top of the directory:

* **List view (default):** The full table described above.
* **Map view:** Plots your readers geographically with a status pin at each location, for a quick regional or national overview.

## Inspecting a Device

<figure><img src="https://4093728396-files.gitbook.io/~/files/v0/b/gitbook-x-prod.appspot.com/o/spaces%2Fwjbnqo0srzj14AwQMHQM%2Fuploads%2FsO3xvDvH8ysdaJcKS2ZP%2Fimage.png?alt=media&amp;token=c130f340-de29-46ae-975c-b9fd83320903" alt=""><figcaption></figcaption></figure>

Click any serial number to open the inspection drawer on the right. It shows the reader's connection details and lets you send it a command:

* **Command and response addresses** — the drawer displays the reader's QwantiFi command and response addresses. For what these are and how the addressing works, see the topic model in the [<mark style="color:red;">**POS Integration Guide**</mark>](https://developer.magtek.com/guides/guides/qwantifi/pos-integration-guide).
* **Send a command** — enter a Hex or ASCII payload and send it directly to the reader; the response appears below. For the command set and payload format, see the [<mark style="color:red;">**DynaFamily Programmer's Manual**</mark>](https://developer.magtek.com/api-and-command-reference/dynafamily-programmers-manual)<mark style="color:red;">**.**</mark>

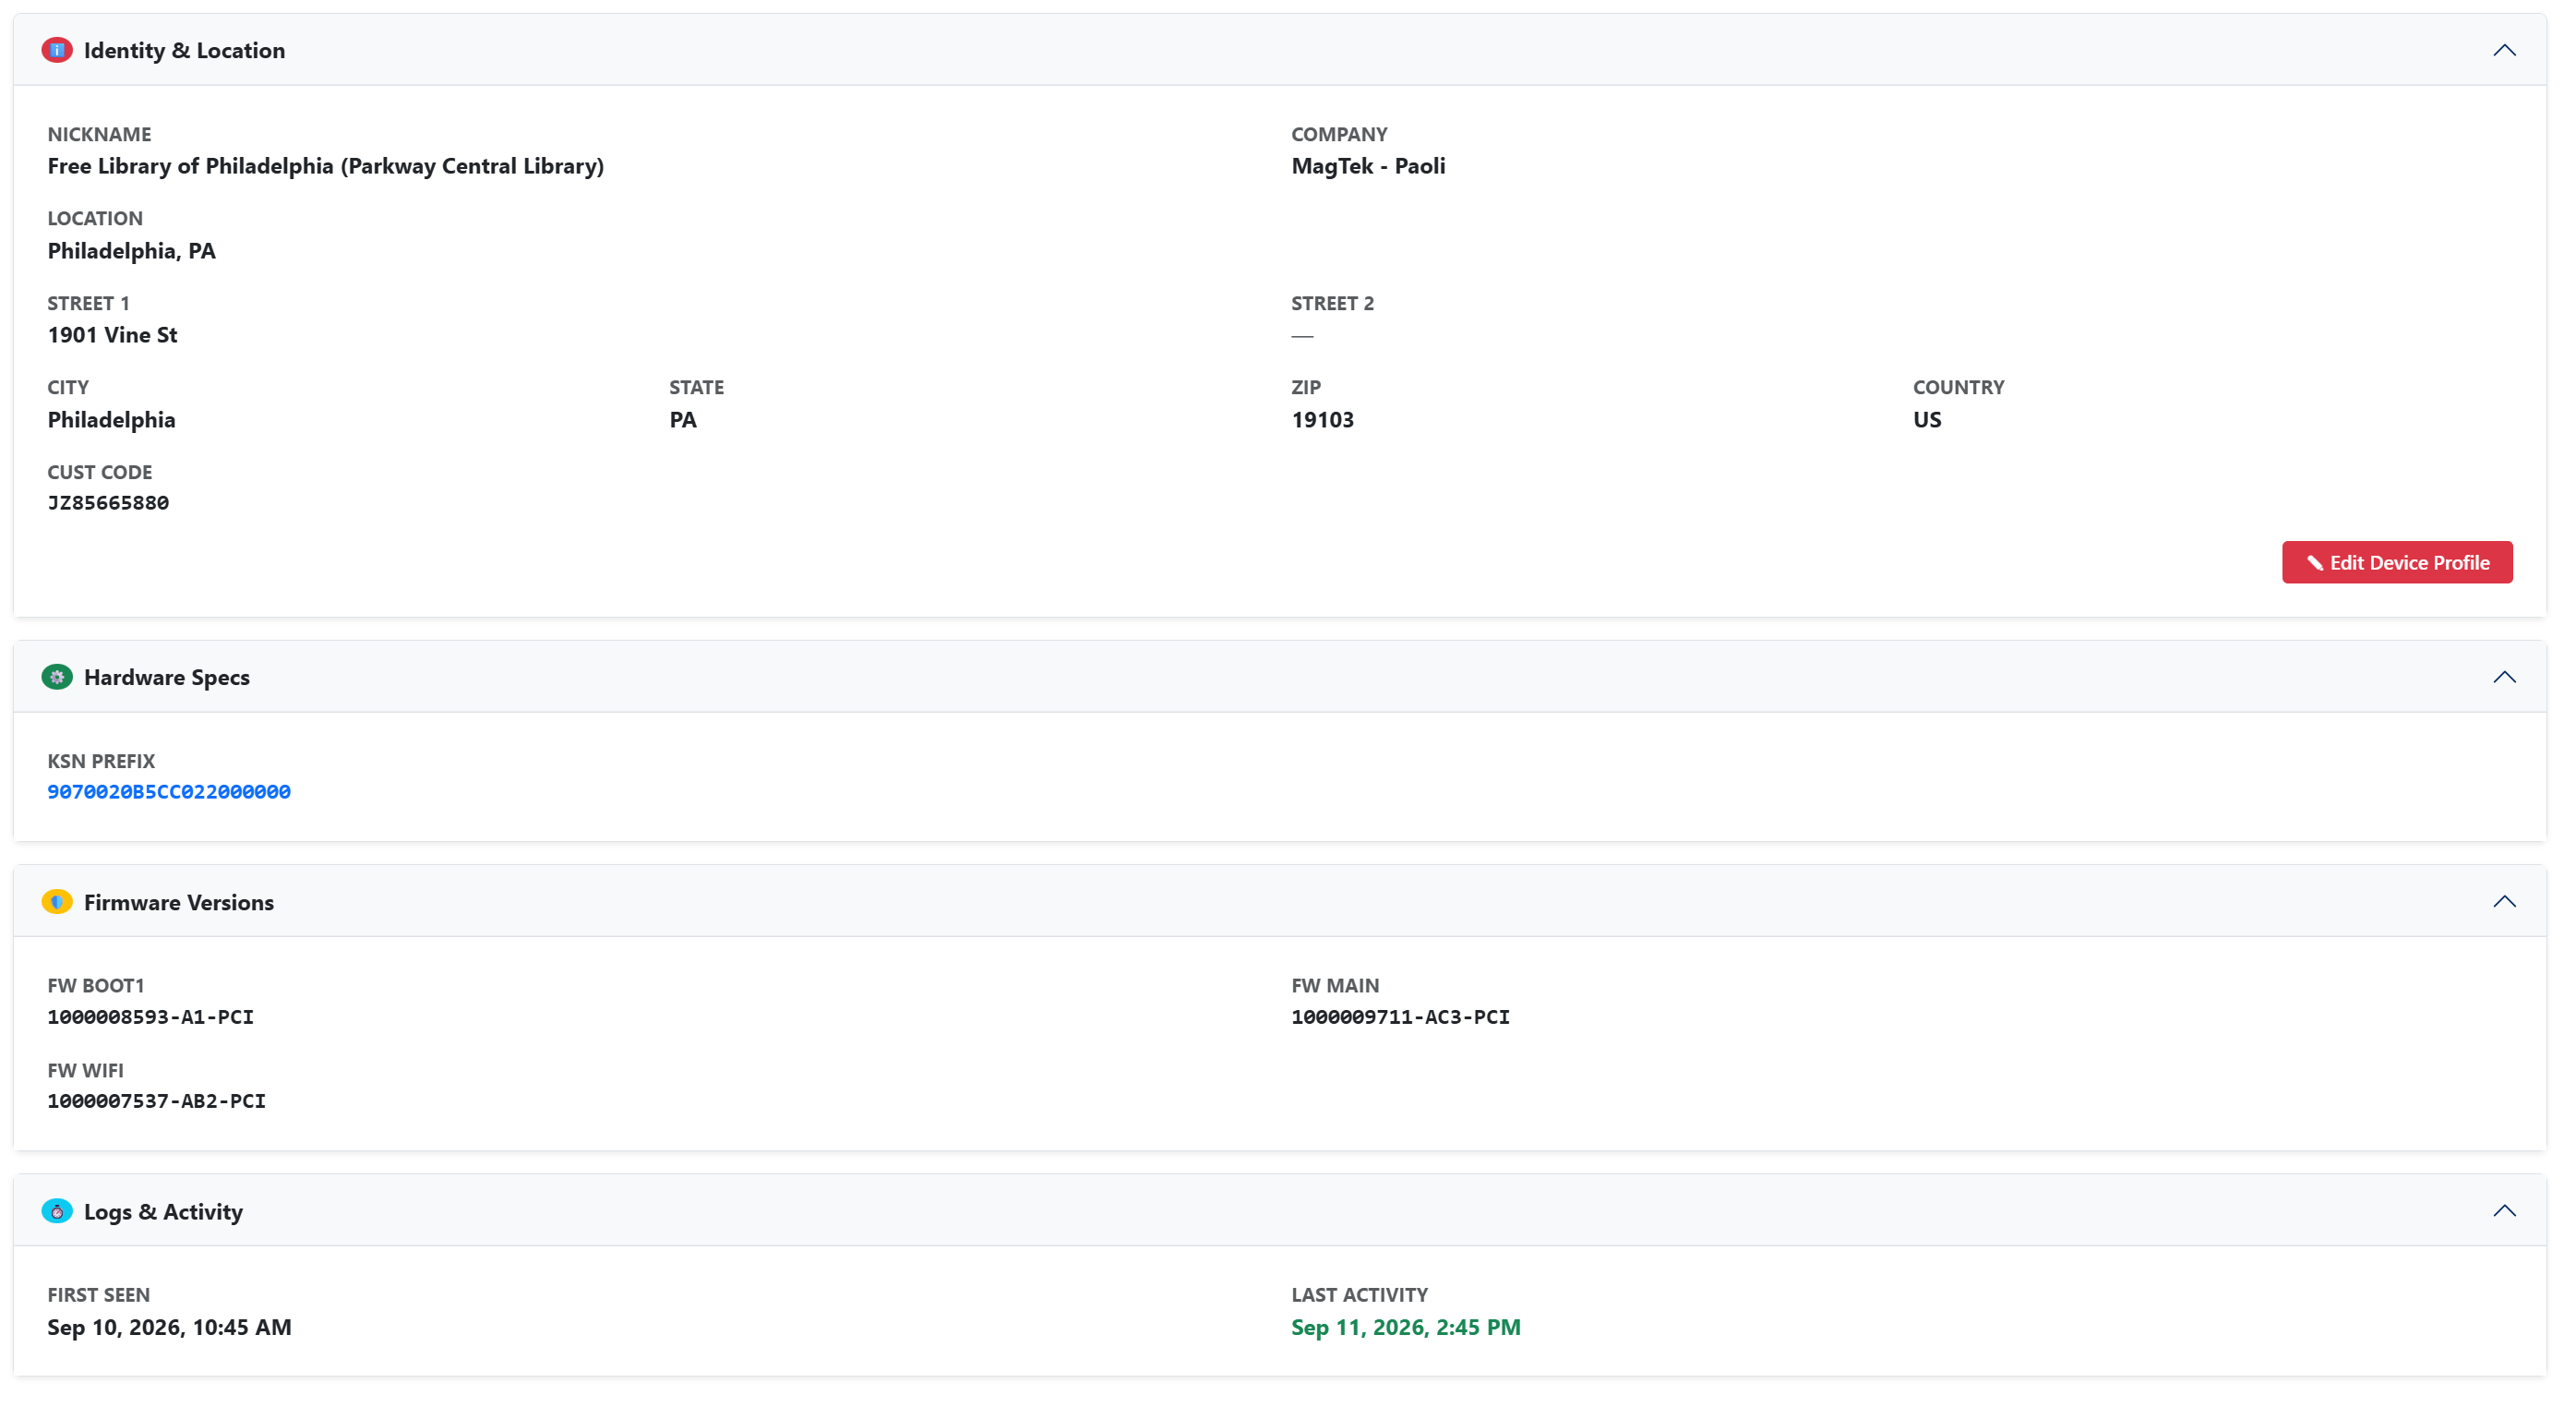
## Hardware and Profile drawers

<figure><img src="https://4093728396-files.gitbook.io/~/files/v0/b/gitbook-x-prod.appspot.com/o/spaces%2Fwjbnqo0srzj14AwQMHQM%2Fuploads%2FnX4ekI4ORSaPZjCq2dV1%2Fimage.png?alt=media&amp;token=792f10b9-5b51-41a7-a1dd-d08521177848" alt=""><figcaption></figcaption></figure>

Below the command panel, four expandable drawers hold the selected reader's full profile:

* **Identity & Location:** Nickname, company, full street address, and customer code (editable via **Edit Device Profile**).
* **Hardware Specs:** The security KSN prefix.
* **Firmware Versions:** The Boot1, Main, and Wi-Fi firmware levels.
* **Logs & Activity:** First-seen and last-activity timestamps.

## Bulk Actions and the Script Runner

<figure><img src="https://4093728396-files.gitbook.io/~/files/v0/b/gitbook-x-prod.appspot.com/o/spaces%2Fwjbnqo0srzj14AwQMHQM%2Fuploads%2FglNB5L8MQ5dDFh8WMSYI%2Fimage.png?alt=media&amp;token=f2d5a7d3-b27c-4a2c-ba4d-f06a1f1e6a14" alt=""><figcaption></figcaption></figure>

For managing many readers at once:

* **Fleet action bar:** When you select one or more readers with the checkboxes, the **Block** / **Unblock** controls activate so you can change access across the whole selection.
* **Script Runner:** Upload a command payload to broadcast an operation, such as a configuration or diagnostic sweep, across your connected readers.

{% hint style="info" %}
**Note:** Bulk actions and broadcast scripts apply to many terminals at once. Confirm your selection and your payload before you run them — for the command and payload format, see the [<mark style="color:red;">**DynaFamily Programmer's Manual**</mark>](https://developer.magtek.com/api-and-command-reference/dynafamily-programmers-manual)<mark style="color:red;">**.**</mark>&#x20;
{% endhint %}

## Live Activity Stream

<figure><img src="https://4093728396-files.gitbook.io/~/files/v0/b/gitbook-x-prod.appspot.com/o/spaces%2Fwjbnqo0srzj14AwQMHQM%2Fuploads%2FluZqpwqqrgXuuE7wljyS%2Fimage.png?alt=media&amp;token=8eedefc8-d4c6-4778-b43e-75f2b0140ba1" alt=""><figcaption></figcaption></figure>

The console at the bottom of the dashboard streams live events across your fleet — connection status, heartbeats, and lifecycle messages — as they happen. Use it to confirm a reader has come online, or to watch activity during a deployment. Clear it at any time with **Clear Console Stream**.

## Registering a Device

Registering a reader starts in the dashboard and finishes in the Cloud Device Management tool:

1. **Start registration**
   1. In the Magensa Reseller Portal, open the **Devices** section to display the dashboard
   2. Scroll to the bottom of the device list
   3. Click **Register Device**.
2. **Choose the merchant**
   1. In the **Select a merchant** dialog, pick the merchant to onboard to
   2. Click **Proceed**. This opens the [<mark style="color:red;">**QwantiFi Cloud Device Management tool**</mark>](https://developer.magtek.com/sdks-and-tools/tools-and-utilities/qwantifi-cloud-device-management-tool-guide) in a new tab.
3. **Finish in the Cloud Device Management tool**&#x20;
4. Connect the reader over USB
5. Set Wi-Fi and location and push the configuration to the reader; it reboots and comes online in QwantiFi. The full step-by-step is in the [<mark style="color:red;">**QwantiFi Cloud Device Management (Tool Guide)**</mark>](https://developer.magtek.com/sdks-and-tools/tools-and-utilities/qwantifi-cloud-device-management-tool-guide)<mark style="color:red;">**.**</mark>

<figure><img src="https://4093728396-files.gitbook.io/~/files/v0/b/gitbook-x-prod.appspot.com/o/spaces%2Fwjbnqo0srzj14AwQMHQM%2Fuploads%2FdzLWK7bbKk4EUchjYiL5%2Fimage.png?alt=media&amp;token=785741c7-3051-4028-86d1-d51ca7e177f9" alt=""><figcaption></figcaption></figure>

## Related Documentation

<table data-header-hidden><thead><tr><th valign="middle"></th><th></th></tr></thead><tbody><tr><td valign="middle"><strong>Reference Section</strong></td><td><strong>Information Available</strong></td></tr><tr><td valign="middle"><a href="https://developer.magtek.com/services/qwantifi/qwantifi-overview"><mark style="color:red;"><strong>QwantiFi Overview</strong></mark></a></td><td>The per-device setup tool used during registration.</td></tr><tr><td valign="middle"><a href="https://developer.magtek.com/sdks-and-tools/tools-and-utilities/qwantifi-cloud-device-management-tool-guide"><mark style="color:red;"><strong>QwantiFi Cloud Device Management (Tool Guide)</strong></mark></a></td><td>The topic model and how a POS commands readers.</td></tr><tr><td valign="middle"><a href="https://developer.magtek.com/guides/guides/qwantifi/pos-integration-guide"><mark style="color:red;"><strong>POS Integration Guide</strong></mark></a></td><td>How access to QwantiFi is authorized..</td></tr><tr><td valign="middle"><a href="https://developer.magtek.com/api-and-command-reference/qwantifi-api-and-command-reference/pos-mqtt-api-reference"><mark style="color:red;"><strong>POS API Reference</strong></mark></a></td><td> The QwantiFi endpoint references</td></tr><tr><td valign="middle"><a href="https://developer.magtek.com/services/qwantifi"><mark style="color:red;"><strong>QwantiFi (Services)</strong></mark></a></td><td>The top-level QwantiFi hub.</td></tr></tbody></table>

## Need More Help

{% hint style="info" %}
**Need Help?**

For additional support, please contact MagTek Support:

**Technical Support:**

* 📧 **Email:** [support@magtek.com](mailto:support@magtek.com?subject=Support%20Request)
* 📞 **Phone:** 1-562-546-6800 (US)
* 🕐 **Hours:** Monday-Friday, 5:30 AM - 5:00 PM PST

**Online Resources:**

* 🌐 **Support Portal:** developer.magtek.com

**Documentation Feedback:**

Help us improve this documentation! [feedback@magtek.com](mailto:feedback@magtek.com?subject=Feedback)
{% endhint %}


---

# Agent Instructions
This documentation is published with GitBook. GitBook is the documentation platform designed so that both humans and AI agents can read, navigate, and reason over technical content effectively. Learn more at gitbook.com.

## Querying This Documentation
If you need additional information that is not directly available in this page, you can query the documentation dynamically by asking a question.

Perform an HTTP GET request on the current page URL with the `ask` query parameter, and the optional `goal` query parameter:

```
GET https://developer.magtek.com/sdks-and-tools/tools-and-utilities/qwantifi-tools-manuals/qwantifi-cloud-dashboard-guide.md?ask=<question>&goal=<endgoal>
```

`ask` is the immediate question: it should be specific, self-contained, and written in natural language.
`goal` is optional and describes the broader end goal you are ultimately trying to accomplish on behalf of the user. GitBook uses it to tailor the answer towards what is most useful for that goal.

The response will contain a direct answer to the question and relevant excerpts and sources from the documentation.

Use this mechanism when the answer is not explicitly present in the current page, you need clarification or additional context, or you want to retrieve related documentation sections.
