This document provides instructions for software developers who want to create .NET / Java software solutions that include a MagTek Common Message Structure (MTCMS) device connected to a Windows PC.
System Requirements
Language
Requirements
.NET
· Windows 7
· Windows 8, 8.1
· Windows 10
· Microsoft .NET Framework 4.5 or above.
Java Library
Common Message Structure (MTCMS) (Microsoft .NET/Java/Applet)
Manual Part Number: D998200160-20
REGISTERED TO ISO 9001:2015
Information in this publication is subject to change without notice and may contain technical inaccuracies or graphical discrepancies. Changes or improvements made to this product will be updated in the next publication release. No part of this document may be reproduced or transmitted in any form or by any means, electronic or mechanical, for any purpose, without the express written permission of MagTek, Inc.
MagTek® is a registered trademark of MagTek, Inc. oDynamo™ is a registered trademark of MagTek, Inc.
Microsoft® and Windows® are registered trademarks of Microsoft Corporation. Java™ and Java Applet™ are registered trademarks of Oracle.
Bluetooth®, Bluetooth® Low Energy, Bluetooth® LE are registered trademarks of Bluetooth SIG, Inc. All other system names and product names are the property of their respective owners.
· Windows 7
· Windows 8, 8.1
· Windows 10
· Java Build Platform: JDK 1.8, 32-bit and above.
· Minimum Java Runtime requirement: 8
Java Applet
· Windows 7
· Windows 8, 8.1
· Windows 10
Tested web browsers:
· Internet Explorer 11
· Java Runtime requirements: Java 8.
· Tested Java Runtime Environments: 8u221
Table 0.1 Revisions
Rev Number
Date
Notes
10
05/24/2018
Initial Release
20
09/17/2019
IMPORTANT: YOU SHOULD CAREFULLY READ ALL THE TERMS, CONDITIONS AND RESTRICTIONS OF THIS LICENSE AGREEMENT BEFORE INSTALLING THE SOFTWARE PACKAGE. YOUR INSTALLATION OF THE SOFTWARE PACKAGE PRESUMES YOUR ACCEPTANCE OF THE TERMS, CONDITIONS, AND RESTRICTIONS CONTAINED IN THIS AGREEMENT. IF YOU DO NOT AGREE WITH THESE TERMS, CONDITIONS, AND RESTRICTIONS, PROMPTLY RETURN THE SOFTWARE PACKAGE AND ASSOCIATED DOCUMENTATION TO THE ADDRESS ON THE FRONT PAGE OF THIS DOCUMENT, ATTENTION: CUSTOMER SUPPORT.
TERMS, CONDITIONS, AND RESTRICTIONS
MagTek, Incorporated (the "Licensor") owns and has the right to distribute the described software and documentation, collectively referred to as the "Software."
LICENSE: Licensor grants you (the "Licensee") the right to use the Software in conjunction with MagTek products. LICENSEE MAY NOT COPY, MODIFY, OR TRANSFER THE SOFTWARE IN WHOLE OR IN PART EXCEPT AS EXPRESSLY PROVIDED IN THIS AGREEMENT. Licensee
may not decompile, disassemble, or in any other manner attempt to reverse engineer the Software. Licensee shall not tamper with, bypass, or alter any security features of the software or attempt to do so.
TRANSFER: Licensee may not transfer the Software or license to the Software to another party without the prior written authorization of the Licensor. If Licensee transfers the Software without authorization, all rights granted under this Agreement are automatically terminated.
COPYRIGHT: The Software is copyrighted. Licensee may not copy the Software except for archival purposes or to load for execution purposes. All other copies of the Software are in violation of this Agreement.
TERM: This Agreement is in effect as long as Licensee continues the use of the Software. The Licensor also reserves the right to terminate this Agreement if Licensee fails to comply with any of the terms, conditions, or restrictions contained herein. Should Licensor terminate this Agreement due to Licensee's failure to comply, Licensee agrees to return the Software to Licensor. Receipt of returned Software by the Licensor shall mark the termination.
LIMITED WARRANTY: Licensor warrants to the Licensee that the disk(s) or other media on which the Software is recorded are free from defects in material or workmanship under normal use.
THE SOFTWARE IS PROVIDED AS IS. LICENSOR MAKES NO OTHER WARRANTY OF ANY KIND, EITHER EXPRESS OR IMPLIED, INCLUDING, BUT NOT LIMITED TO, THE IMPLIED WARRANTIES OF MERCHANTABILITY AND FITNESS FOR A PARTICULAR PURPOSE.
Because of the diversity of conditions and PC hardware under which the Software may be used, Licensor does not warrant that the Software will meet Licensee specifications or that the operation of the Software will be uninterrupted or free of errors.
IN NO EVENT WILL LICENSOR BE LIABLE FOR ANY DAMAGES, INCLUDING ANY LOST PROFITS, LOST SAVINGS, OR OTHER INCIDENTAL OR CONSEQUENTIAL DAMAGES ARISING OUT OF THE USE, OR INABILITY TO USE, THE SOFTWARE. Licensee's sole remedy in
the event of a defect in material or workmanship is expressly limited to replacement of the Software disk(s) if applicable.
GOVERNING LAW: If any provision of this Agreement is found to be unlawful, void, or unenforceable, that provision shall be removed from consideration under this Agreement and will not affect the enforceability of any of the remaining provisions. This Agreement shall be governed by the laws of the State of California and shall inure to the benefit of MagTek, Incorporated, its successors or assigns.
ACKNOWLEDGMENT: LICENSEE ACKNOWLEDGES THAT HE HAS READ THIS AGREEMENT, UNDERSTANDS ALL OF ITS TERMS, CONDITIONS, AND RESTRICTIONS, AND AGREES TO BE BOUND BY THEM. LICENSEE ALSO AGREES THAT THIS AGREEMENT SUPERSEDES ANY AND ALL VERBAL AND WRITTEN COMMUNICATIONS BETWEEN LICENSOR AND LICENSEE OR THEIR ASSIGNS RELATING TO THE SUBJECT MATTER OF THIS AGREEMENT.
QUESTIONS REGARDING THIS AGREEMENT SHOULD BE ADDRESSED IN WRITING TO MAGTEK, INCORPORATED, ATTENTION: CUSTOMER SUPPORT, AT THE ADDRESS LISTED IN THIS DOCUMENT, OR E-MAILED TO SUPPORT@MAGTEK.COM.
SOFTWARE LICENSE AGREEMENT
Update Java System Requirements.
How to Set Up the MagTek CMS SDK for .NET Projects
Custom Windows software installed on a host PC can communicate with MagTek Common Message Structure (MTCMS) devices via USB, network interface, or serial interface using the MTCMS library.
The supported platforms for .NET projects include Windows 7, Windows 8/8.1, and Windows 10. The .NET project should contain references to the main library file: MTCMSNET.dll.
To add the MagTek CMS library to a .NET project in Microsoft Visual Studio, follow these steps:
Create or open your .NET project in Visual Studio.
Copy the following DLL file from the Library folders to the library folder of your software project: MTCMSNET.dll.
In the Visual Studio Solution Explorer, right-click the project and select Add Reference window to show the Add Reference window.
Select the Browse tab and press the Browse... button.
Navigate to your library folder, select MTCMSNET.dll, then press the Add button.
In your custom software, create an instance of MTDevice. For examples, see the source code included with the MTCMSNETDemo project and/or Appendix A Code Examples.
Begin using the features provided by the MTCMS library.
MTCMSResponseMessage Class Methods
This class is a subclass of MTCMSMessage. This class instantiates an MTCMSMessages instance with MessageID value set to the Response message type.
MTCMSResponseMessage
This constructor method builds and initializes an MTCMSResponseMessage instance with the provided values.
public void MTCMSResponseMessage(int applicationID, int commandID, int dataTag, byte[] data)
Parameters:
Parameter
Description
applicationID
Return Value: None
MTCMSRequestMessage Class Methods
This class is a subclass of MTCMSMessage. This class instantiates an MTCMSMessages instance with MessageID value set to the Request message type.
This constructor method builds and initializes an MTCMSRequestMessage instance with the provided values.
Parameters:
MTCMSNotificationMessage Class Methods
This class is a subclass of MTCMSMessage. This class instantiates an MTCMSMessages instance with MessageID value set to the Notification message type.
This constructor method builds and initializes an MTCMSNotificationtMessage instance with the provided values.
Parameters:
ApplicationID value
commandID
CommandID value
dataTag
Data Tag value
data
Data value
Return Value: None
public void MTCMSRequestMessage(int applicationID, int commandID, int dataTag, byte[] data)
Parameter
Description
applicationID
MTCMSRequestMessage
Return Value: None
public void MTCMSNotificationMessage(int applicationID, int commandID,
int dataTag, byte[] data)
MTCMSNotificationMessage representing data received.
OnDeviceConnectionStateChanged
OnDeviceDataString
OnDeviceDataBytes
OnDeviceResponseMessage
OnDeviceNotificationMessage
applicationID
ApplicationID value
commandID
CommandID value
dataTag
Data Tag value
data
Data value
Return Value: None
This constructor method builds an MTCMSMessage instance with the provided byte array value.
Parameters:
Parameter
Description
messageBytes
Message byte array value
Return Value: None
This method sets the value of MessageType.
Parameters:
Parameter
Description
messageType
MessageType value
Return Value: None
This method sets the value of ApplciationID.
Parameters:
Parameter
Description
applicationID
ApplicationID value
Return Value: None
This method sets the value of CommandID.
Parameters:
Parameter
Description
commandID
CommandID value
Return Value: None
This method sets the value of ResultCode.
Parameters:
Parameter
Description
resultCode
ResultCode value
Return Value: None
This method sets the value of Data Tag and the value of Data.
Parameters:
Parameter
Description
dataTag
Data Tag value
data
Data value
Return Value: None
This method returns the value of MessageType.
Return Value: MessageType value.
This method returns the value of ApplicationID.
Return Value: ApplicationID value.
This method returns the value of CommandID.
Return Value: CommandID value.
This method returns the value of ResultCode.
Return Value: ResultCode value.
This method returns the value of Data Tag.
Return Value: Data Tag value.
This method returns the value of Data.
Return Value: Data value.
This method returns the message bytes.
Return Value: Message bytes.
Parameter
Description
messageType
MTCMSMessage
MessageType value
MTCMSMessage
setMessageType
setApplicationID
setCommandID
setResultCode
setData
getMessageType
getApplicationID
getCommandID
getResultCode
getDataTag
getData
getMessageBytes
public event DeviceListHandler OnDeviceList
public delegate void DeviceListHandler(object sender,
MTConnectionType connectionType, List<MTDeviceInformation> deviceList)
public event DeviceDataStringHandler OnDeviceDataString

public delegate void DeviceDataStringHandler(object sender, string dataString)
public event DeviceDataBytesHandler OnDeviceDataBytes
public delegate void DeviceDataBytesHandler(object sender, byte[] dataBytes)
public event DeviceResponseMessageHandler OnDeviceResponseMessage
public delegate void DeviceResponseMessageHandler(object sender,
MTCMSResponseMessage response)
public event DeviceNotificationMessageHandler OnDeviceNotificationMessage

public delegate void DeviceNotificationMessageHandler(object sender,
MTCMSNotificationMessage notification)
public void MTCMSMessage(int messageType, int applicationID, int commandID, int dataTag, byte[] data)
public void MTCMSMessage(byte[] messageBytes)
public void setMessageType(int messageType)
public void setMessageType(int messageType)
public void setCommandID(int commandID)
public void setResultCode (int resultCode)
public void setData (int dataTag, byte[] data)
public int getMessageType()
public int getApplciationID()
public int getCommandID()
public int getResultCode()
public int getDataTag()
public byte[] getData()
public byte[] getMessageBytes()
How to Set Up the MagTek CMS SDK for Java Demo
How to Set Up the Java Library With the 32-bit JRE/JVM
MagTek highly recommends using the 32-bit version of Java when using the PCI PED Java applet, regardless of whether you are using a 32-bit or 64-bit version of Windows.
Uninstall any existing instances of the 64-bit Java Runtime Environment (JRE) or Java Development Kit (JDK). Leaving them installed can cause runtime failures, as the library may fail to load.
Download and install the latest version of the 32-bit Java Development Kit (JDK).
If you opted to manually copy the SDK dependencies from a master development workstation to the target workstation where it will be used, follow these steps:
On the master workstation, navigate to the root of the SDK \Library\Java.
Open the \x86 subfolder and copy all the files to the target workstation’s C:\Windows\System32 folder for x86 systems, or to the target workstation’s C:\Windows\SysWOW64 folder for x64 systems.
Connect the device to the workstation using a USB cable. Windows will install the device drivers automatically. Wait for Windows to report the driver installation is complete.
Launch a Windows command prompt as an Administrator.
cd to the root of the folders where the SDK is installed.
Type runsample.bat and press Enter to launch the Java Demo software.
MagTek highly recommends using the 32-bit version of Java if you intend to use the Java applet, regardless of whether you are using a 32-bit or 64-bit version of Windows.
Uninstall any existing instances of the 32-bit Java Runtime Environment (JRE) or Java Development Kit (JDK). Leaving them installed can cause runtime failures, as the library may fail to load.
Download and install the latest version of the 64-bit Java Development Kit (JDK).
If you opted to manually copy the SDK dependencies from a master development workstation to the target workstation where it will be used, follow these steps:
MagTek highly recommends using the 32-bit version of Java when using the Java applet, regardless of whether you are using a 32-bit or 64-bit version of Windows.
To set up the Java applet using the 32-bit version of Java on either a 32-bit or 64-bit version of Windows, follow these steps:
Follow the steps in section How to Set Up the Java Library With the 32-bit JRE/JVM. Having a working JVM, working Java library, working drivers, and working DLLs are prerequisites for using the applet.
Verify Java is installed and that the Internet Explorer Java plugin is working correctly by using Oracle’s Java applet test page, usually provided as a link or auto-launch at the end of installation.
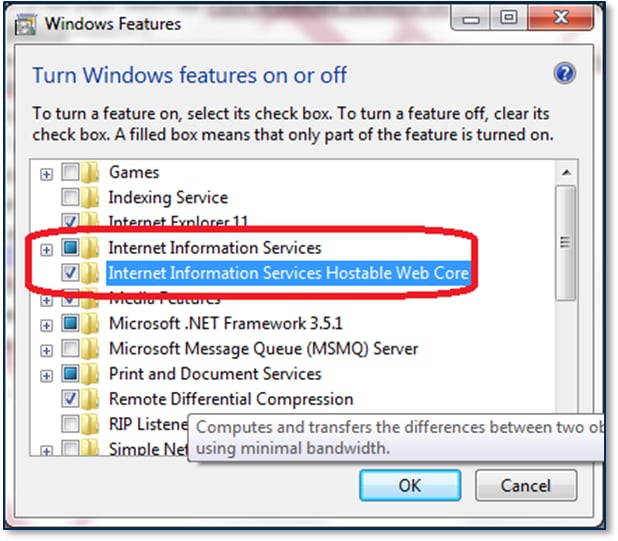
On the Windows 7 workstation you will use for development, enable Internet Information Services 7 (IIS) as follows:
Press the OK button to launch a progress window. Wait for Windows to install IIS.
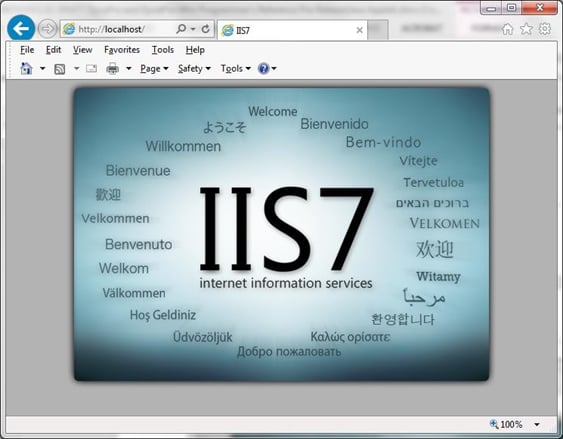
Launch a web browser and navigate to //localhost . Verify the IIS default page appears as shown in Figure 2-1.
Figure 2-1 IIS Default Page
If it does not already exist, create a MTPPSCTA folder in C:\inetpub\wwwroot\ . If it does exist, delete its contents.
On the workstation where the SDK is installed, navigate to the folder where it is installed.
Open the Sample Code\Java Applet\Object\Signed subfolder.
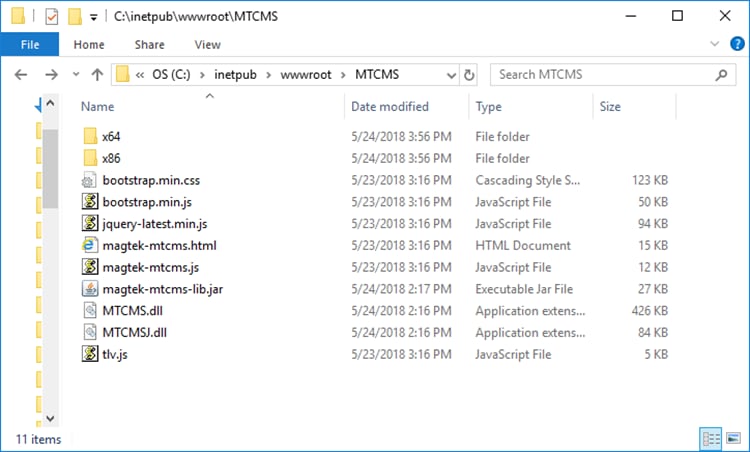
Figure 2-2 - inetpub Structure
Connect the device to the workstation using a USB cable. Windows will install the device drivers automatically. Wait for Windows to report the driver installation is complete.
Open Internet Explorer as an administrator.
If you are using a 64-bit version of Windows with IE11, make sure to launch directly in 32-bit mode using the iexplore.exe found in C:\Program Files (x86). Verify you are running in 32-bit mode using the Help>About menu.
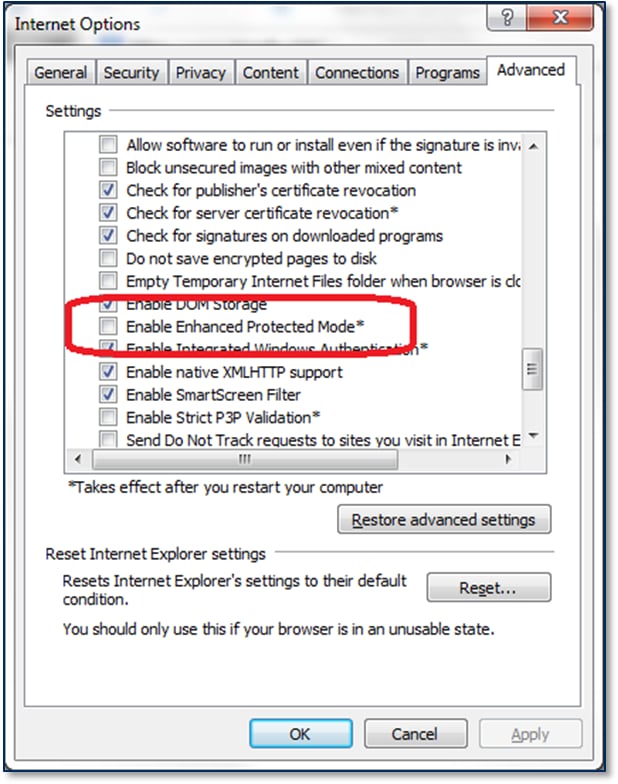
If you changed the value of the Enable Enhanced Protected Mode checkbox, restart Windows.
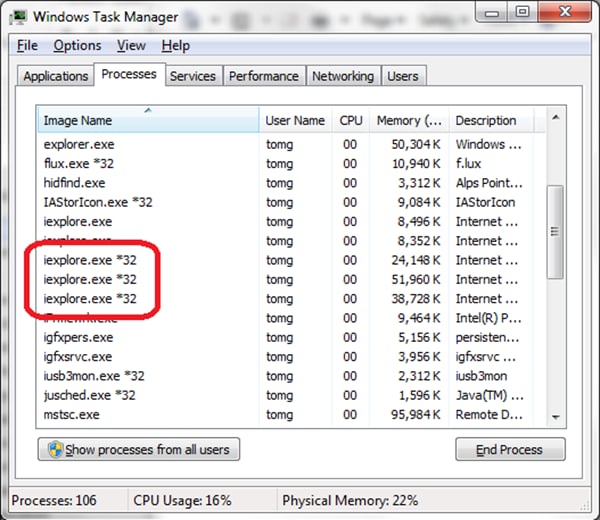
Open Windows Task Manager (Ctrl-Alt-Del > Start Task Manager).
Open the Processes tab and sort by Image Name.
Close the Windows Task Manager window.
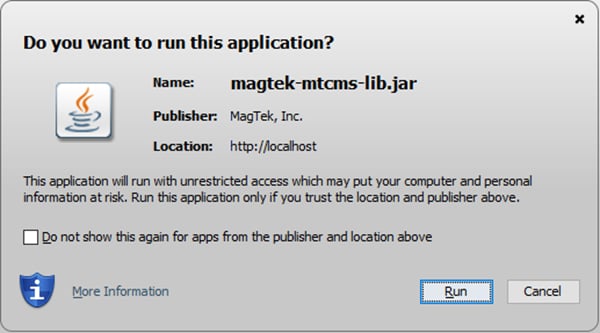
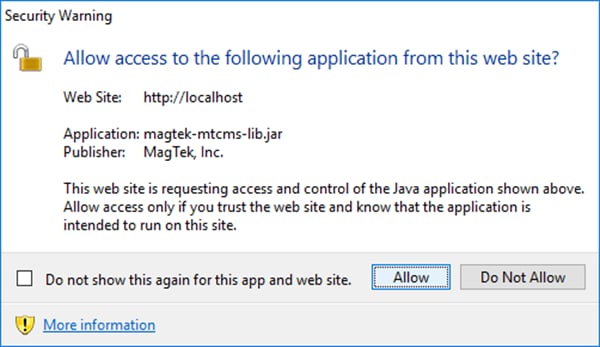
Internet Explorer will display a welcome page and will pop up a Do you want to run this application? window. Press the Run button and the Allow button to run the Java applet.
On the welcome page, press the Connect button.
Press the Get Info button. The large text box in the browser will display device information.
Use the buttons and fields on the welcome page to test the connection to the device.
The Caller-Allowable-Codebase attribute is used to identify the domains from which JavaScript code can make calls to your RIA without security prompts. Set this attribute to the domain that hosts the JavaScript code. If a call is made from JavaScript code that is not located in a domain specified by the Caller-Allowable-Codebaser attribute, the call is blocked. To specify more than one domain, separate the domains by a space, for example:
The Application-Library-Allowable-Codebase attribute identifies the locations where your signed RIA is expected to be found. This attribute is used to determine what is listed in the Location field for the security prompt that is shown to users when the JAR file for your RIA is in a different location than the JNLP file or HTML page that starts your RIA. If the files are not in the locations identified, the RIA is blocked. Set this attribute to the domains where the JAR file, JNLP file, and HTML page are located. To specify more than one domain, separate the domains by a space, for example:
For more information regarding the JAR File Manifest Attributes for Security, please visit this website
In order to modify the Manifest file, please follow these steps. You need to do this for: magtek-mtcms-lib.jar.
Find installation folder by default, the installation folder is: \Sample Code\Java Applet\Object\Unsigned.
Launch the command prompt and extract the META-INF/MANIFEST.MF from the jar file.
Open MANIFEST.MF and look for the Caller-Allowable-Codebase and Application-Library-Allowable-Codebase and add your website URL to the list like the example above.
Update the manifest to the jar file.
These instructions provide an overview of obtaining and using Sun Java signing and a digital certificate. Please follow this instruction to sign and verify both MTCMSJavaSample.jar magtek-mtmcms-lib.jar.
Make sure your machine has the latest Java JDK installed.
Generate a public/private key pair by entering the following command, specifying an alias for your keystore:
Generate a certificate signing request (CSR) by entering the following command:
After prompting you to enter the password for your keystore, keytool will generate a CSR.
Save the certificate received from the Certificate provider as Certname.p7b.
Import your Digital Certificate by entering the following command:
In this string, keytool is requested to import the Digital ID “Certname.cer” into the keystore MyCert.
Bundle your applet into a Java Application Resource (JAR) file by entering the following command:
Sign the files by using jarsigner to sign the JAR file, using the private key you saved in your keystore:
Verify the output of your signed JAR file by entering the following command:
Please visit this website https://docs.oracle.com/javase/tutorial/deployment/jar/signing.html for more information regarding signing JAR files.
On the master workstation, navigate to the root of the SDK \Library\Java
Open the x86 subfolder and copy all the files to the target workstation’s C:\Windows\System32 folder or to the target workstation’s C:\Windows\SysWOW64 folder for x64 systems.
Connect the device to the workstation using a USB cable. Windows will install the device drivers automatically. Wait for Windows to report the driver installation is complete.
Launch a Windows command prompt as an Administrator.
cd to the root of the folders where the SDK is installed.
Type runsample.bat and press Enter to launch the Java Demo software.
Log in to a Windows 7 workstation using an administrator account.
Launch the Windows Control Panel.
Select the Programs and Features item to open the Programs and Features page.
On the left side of the page, select the Turn Windows features on or off link to launch the Windows Features window.
Turn on the checkboxes for Internet Information Services and Internet Information Services Hostable Web Core.
Copy the contents of the subfolder to C:\inetpub\wwwroot\MTCMS .
Open the Sample Code\Java Applet\Object\x85 subfolder.
Copy the contents of the subfolder to C:\inetpub\wwwroot\MTCMS.
If you are running a 64-bit version of Windows with IE10 or higher, choose the Internet options that enable 32-bit mode / disable Protected Mode for the zone you are accessing. Also turn OFF the checkbox for Enhanced Protected Mode in the Internet Options > Advanced tab.
Note the number and location of all iexplore.exe *32 processes.
In Internet Explorer, navigate to
In the Windows Task Manager Processes tab, find the new process for the Internet Explorer tab you just opened and make sure it is running in 32-bit mode ( iexplore.exe *32 instead of iexplore.exe.
After installation on the workstation is complete, future browser sessions do not require the user to launch Internet Explorer as an administrator to use the applet.
After creating an instance of the MTDevice class in your software project, use the methods described in this section to communicate with MagTek CMS device.
requestDeviceList
This method initiates request to discover devices that are visible to the host using the specified connection interface. The OnDeviceList event will provide information regarding the available devices once the discovery process is completed.
public void requestDeviceList(MTConnectionType connectionType)
Parameters:
Parameter
Description
Return Value: None
This method sets the connection type of the device..
Parameters:
Return Value: None
This method sets the address of the device.
Parameters:
The following table shows the address formats supported by the different connection types:
Return Value: None
This method sets the device ID.
Parameters:
Return Value: None
This method opens the connection to the device.
Parameters: None
Return Value: None
This method closes the connection to the device.
Parameters: None
Return Value: None
This method returns whether the device is connected or not.
Parameters: None
Return Value:
Return true if the device is connected. Otherwise, return false.
This method sends a data string to the device.
Parameters:
Return Value:
0 = Success (MTDevice.SEND_SUCCESS)
9 = Error (MTDevice.SEND_ERROR)
15 = Busy (MTDevice.SEND_BUSY)
This method sends data bytes to the device.
Parameters:
Return Value:
0 = Success (MTDevice.SEND_SUCCESS)
9 = Error (MTDevice.SEND_ERROR)
15 = Busy (MTDevice.SEND_BUSY)
This method sends a MagTek CMS message to the device.