To connect DynaMAX or eDynamo to a host with Windows 8.1 or higher and Bluetooth 4.0 hardware that supports Bluetooth LE, follow these steps:
If you are using an external Bluetooth adapter, install any required drivers and connect it to the host.
On the host, install and configure the software you intend to use with DynaMAX or eDynamo:
Make sure the host software is configured to look for the device on the proper connection.
Make sure the host software knows which device(s) it should interface with.
Make sure the host software is configured to properly interpret incoming data from the device. This depends on whether the device is configured to transmit data in GATT format or streaming format emulating a keyboard.
Make sure the DynaMAX’s batteries are installed and have adequate charge. If using eDynamo, make sure the device has an adequate charge.
Test the batteries by powering on the DynaMAX or eDynamo device. Provided the device is not already paired, the Bluetooth Status LED will flash blue every two seconds for up to 60 seconds until pairing is complete. If the Bluetooth Status LED is solid blue, the device is already paired with a host. Unpair from the host it is already paired with before continuing.
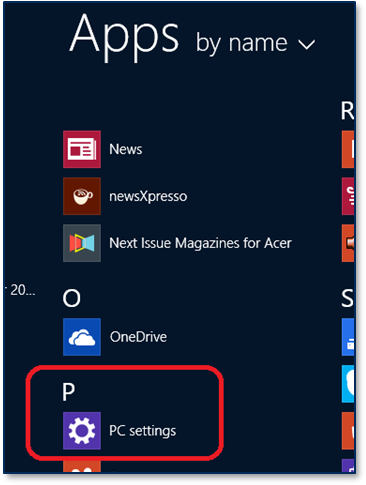
Enter app mode, scroll down to Apps by name , and launch the Windows PC Settings app.
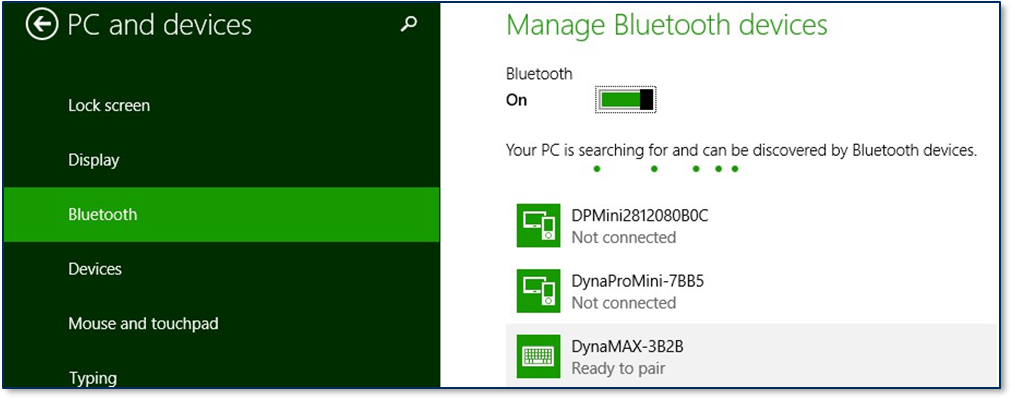
In the left side navigator, select PC and devices > Bluetooth
Make sure Bluetooth is turned on and close the PC and devices all
Launch the Windows Manage Bluetooth Devices app by following these steps:
Locate the serial number on the label on the bottom of the device. Note the final four digits.
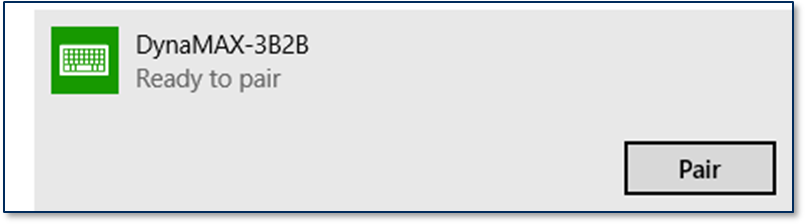
Read through the list of pairable devices and locate the device called DynaMAX-nnnn or eDynamo-nnnn, where nnnn is the last four digits of the device’s serial number (if the device does not show in the list, power it off then power it back on). Below the device name you should see the Ready to pair.
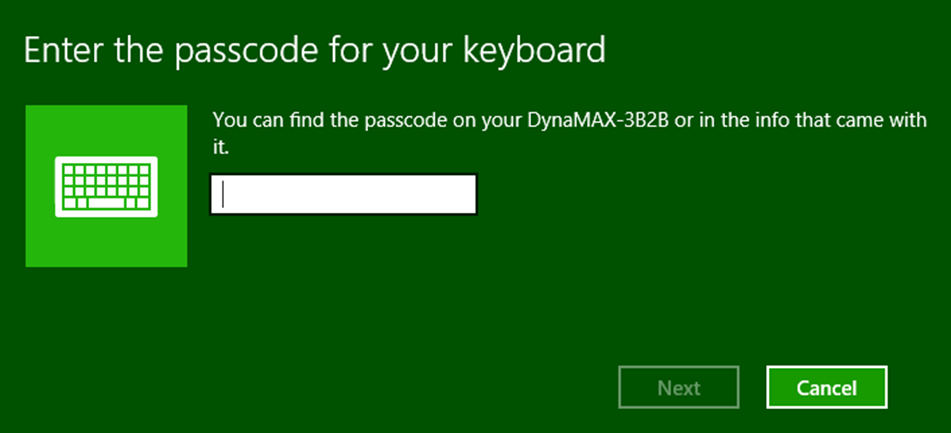
Select the device and press Pair button. If the device is configured to run in KB mode. Windows will prompt you Enter the passcode for your keyboard.
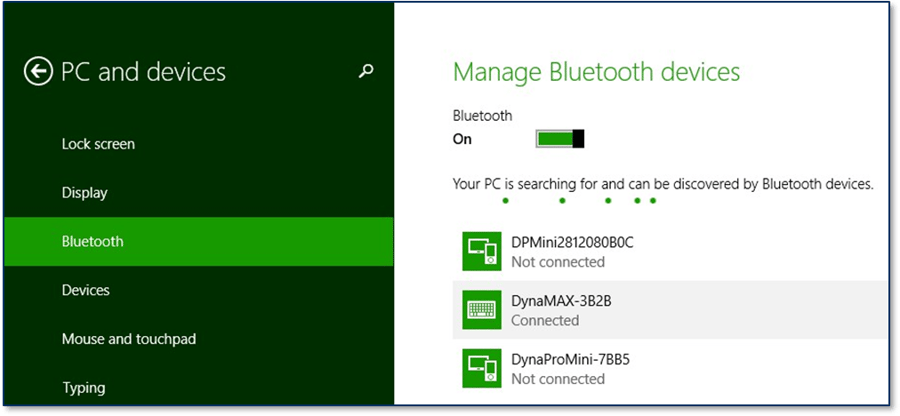
Enter default passcode 000000 (or the device’s actual password if it has been configured differently), then press the Next button. Windows will return you to the Manage Bluetooth devices page. After a short period of time, you will see the text Connected below the device you are pairing with.
After a few seconds, the device will disconnect, which is normal power-saving behavior.
Use the host software to test swiping a card. If you do not yet have host software and the device is configured to run in KB mode, open any text editor and swipe a card. The card contents should appear in the text editor.
The device consumes very little power when not transmitting card data, so it is not necessary to power off the device to conserve power. If the device appears as Not Connected in the Windows list of Bluetooth devices, swiping a card should cause the device to reconnect briefly, transmit the card data, then disconnect.
Remember to change the default password. See the DynaMAX Programmer’s Reference documents for details.
To unpair from the device:
Locate the device in the Manage Bluetooth devices window
Press the Remove device button.
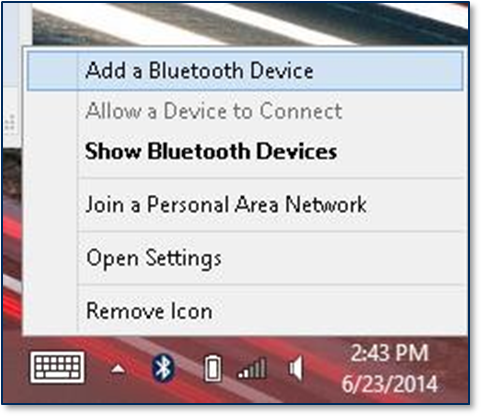
Touch the Bluetooth icon in the system tray and select Add a Bluetooth Devices (see Error! Reference source not found.).
The following instructions detail how to use the MTNET OEM Demo with mDynamo or DynaDip on Windows PC via USB interface.
MTNET OEM Demo queries for device features upon connecting. Some demo features are disabled based on what is supported on the device. MTNET OEM Demo does not automatically set Time.
Connect the device to the USB port of the Windows PC.
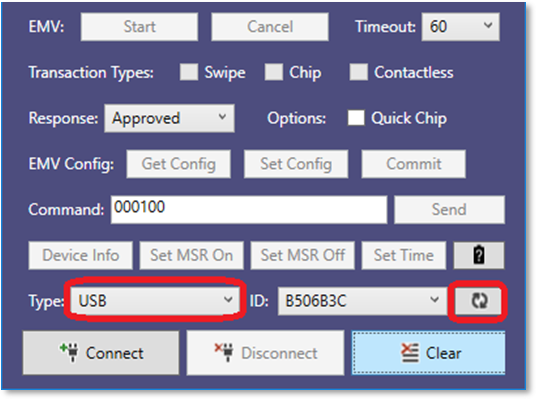
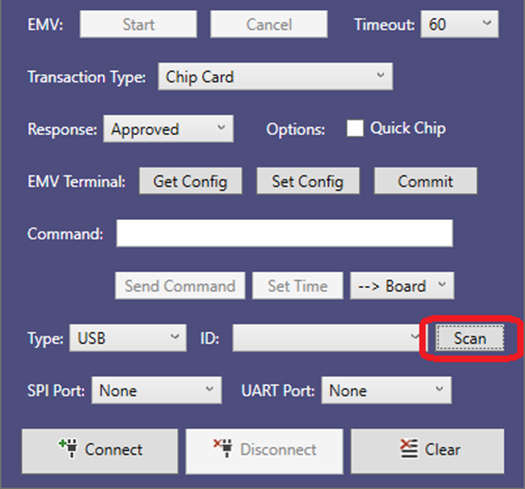
Launch the MTNET OEM Demo and press the button to scan for connected USB devices
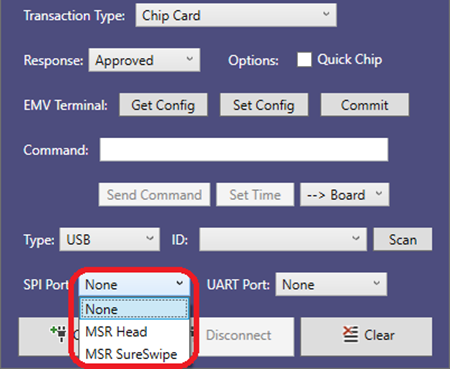
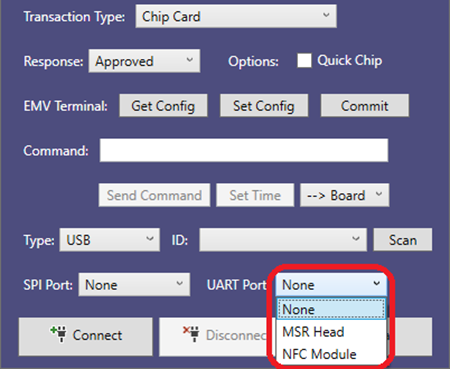
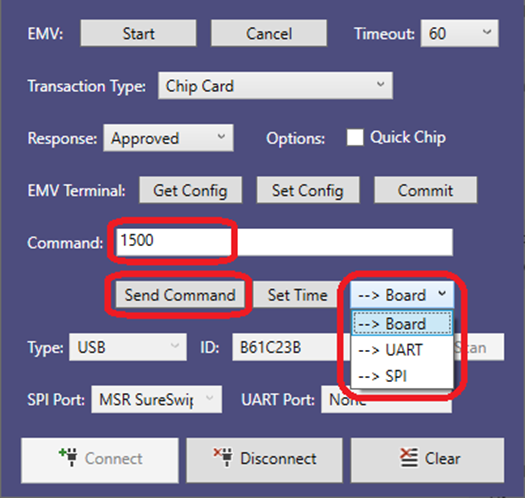
If your device has an additionally attached device to its SPI or UART port, select the appropriate device type in the list for SPI port and UART Port before connecting.
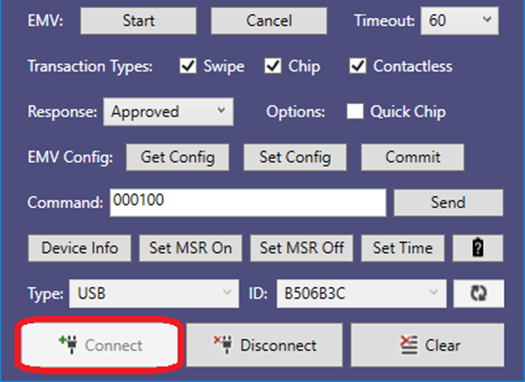
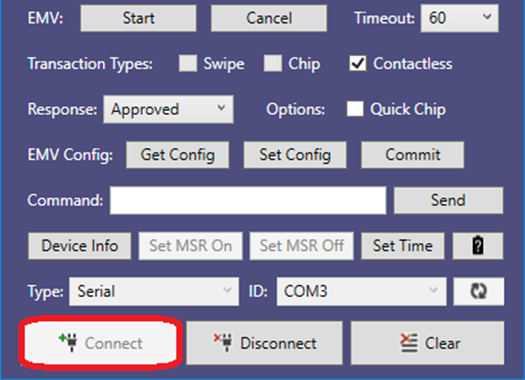
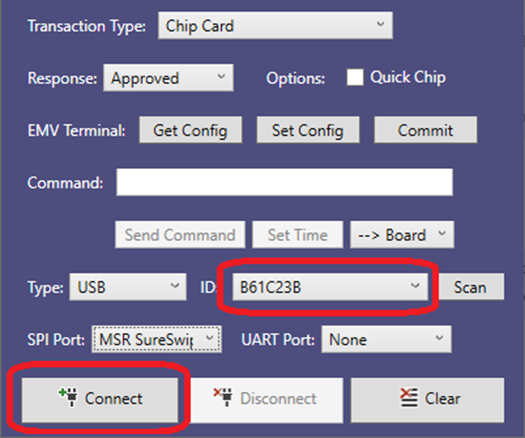
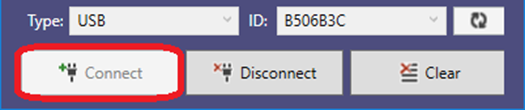
Select the Device ID and press the Connect button to open the device
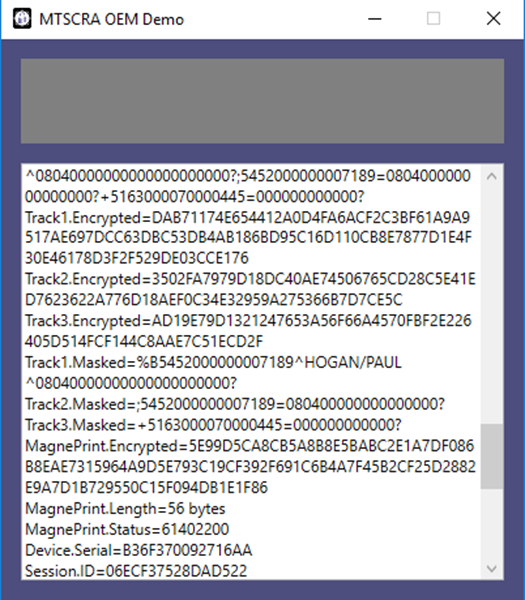
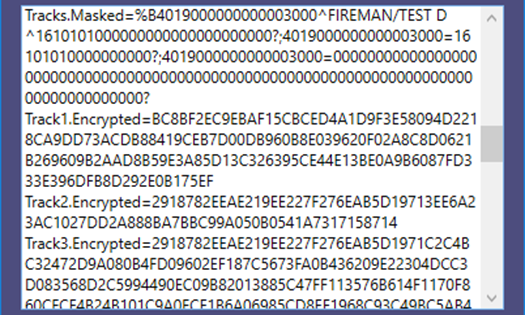
Swipe a magnetic stripe card to read the card data if you have an attached MSR head.
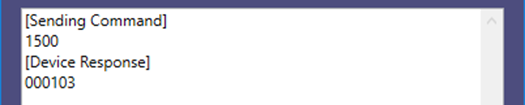
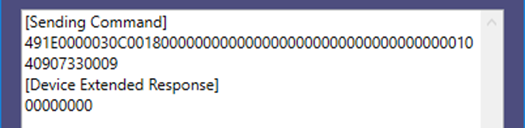
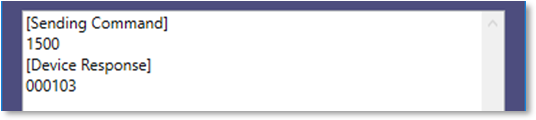
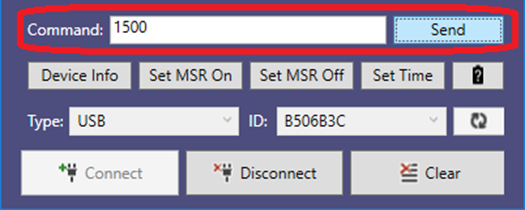
To send a command to the device, enter the command in the command text box, select the appropriate device to send to and press the Send Command button..
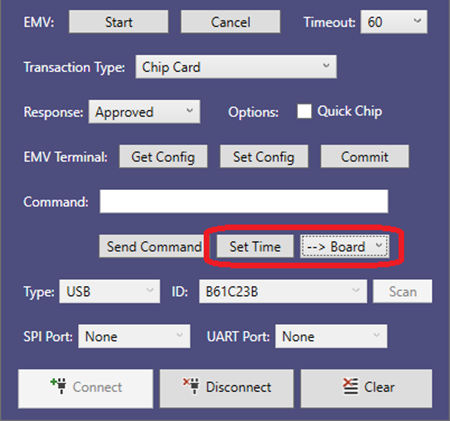
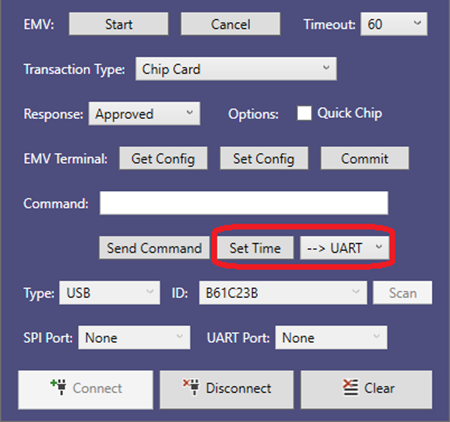
To read a chip card, press the Set Time button and send to the Board. If you have an attached NFC module connected to the UART port, press the Set Time button, and send the UART before reading a contactless card.
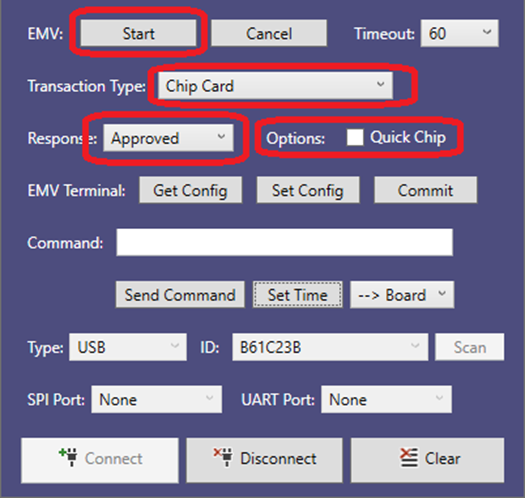
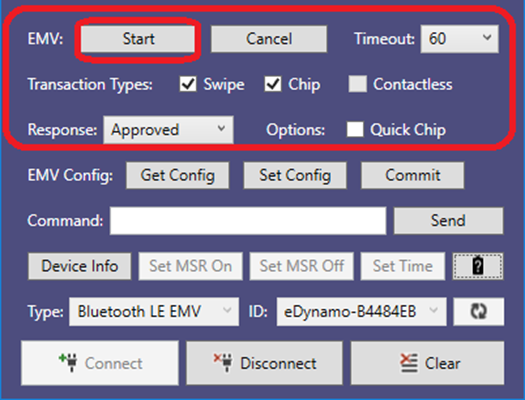
To begin an EMV transaction, select desired Transaction type and Response, press the Start button, and then present the appropriate card whenthe Present Card message appears.
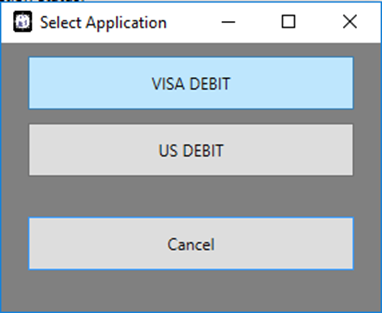
Select an Application in the Select Application window.
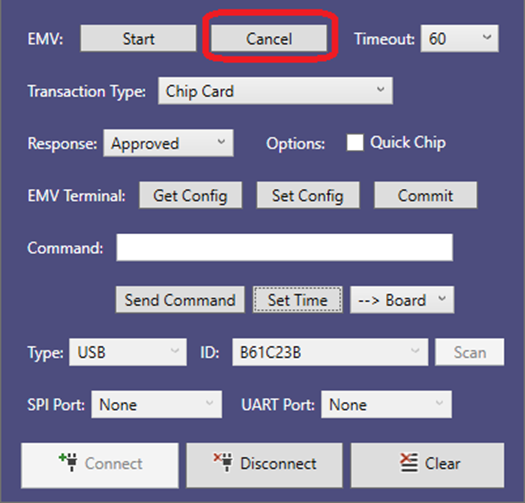
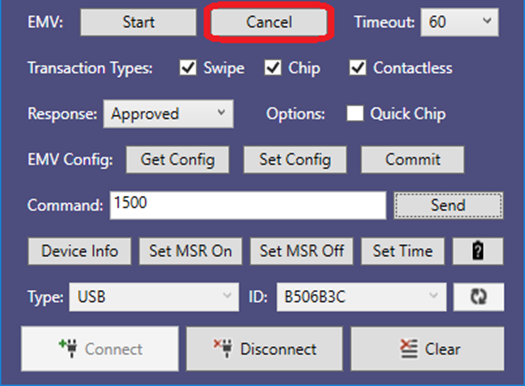
If you want to cancel the EMV transaction, press the Cancel button. Please note that the cancel feature will only work before the card is inserted.
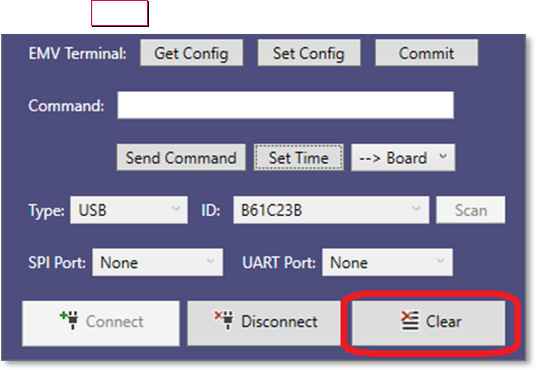
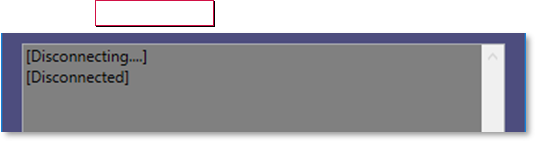
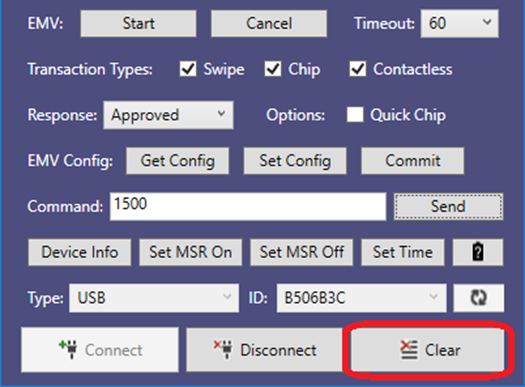
To clear the screen, press the Clear button.
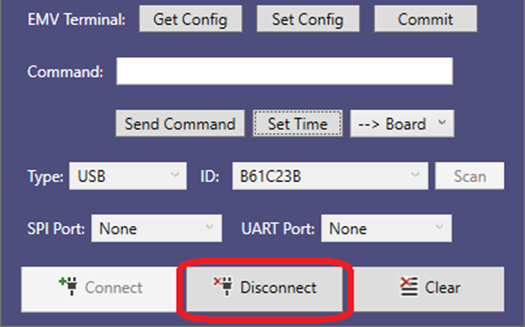
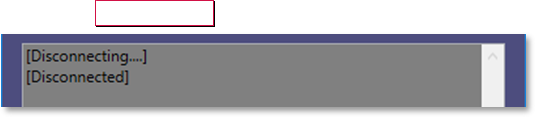
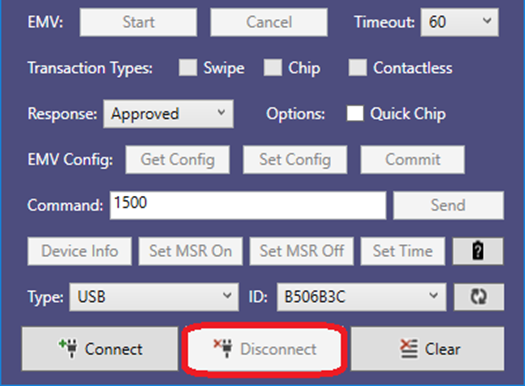
To close the device, press the Disconnect button
MagTek I 1710 Apollo Court I Seal Beach, CA 90740 I Phone: (562) 546-6400 I Technical Support: (888) 624-8350
Copyright © 2006 - 2024 MagTek, Inc. Printed in the United States of America
Information in this publication is subject to change without notice and may contain technical inaccuracies or graphical discrepancies. Changes or improvements made to this product will be updated in the next publication release. No part of this document may be reproduced or transmitted in any form or by any means, electronic or mechanical, for any purpose, without the express written permission of MagTek, Inc.
MagTek® is a registered trademark of MagTek, Inc. MagneSafe® is a registered trademark of MagTek, Inc. iDynamo™, and uDynamo are trademarks of MagTek, Inc.
eDynamo™, Dynamag, DynaMAX and DynaDip are trademarks of MagTek, Inc.
The Bluetooth® word mark and logos are registered trademarks owned by Bluetooth SIG, Inc. and any use of such marks by MagTek is under license.
The following instructions detail how to use the MTNET Demo on Windows PC via USB interface. Same instructions apply to the other interface types.
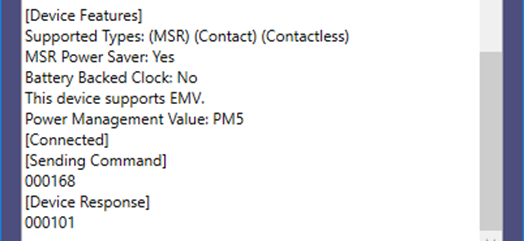
MTNET Demo queries for device features upon connecting. Some demo features are disabled based on what is supported on the device. MTNET Demo does not automatically set MSR power or set Time.
Connect the device to the USB port of the Windows PC.
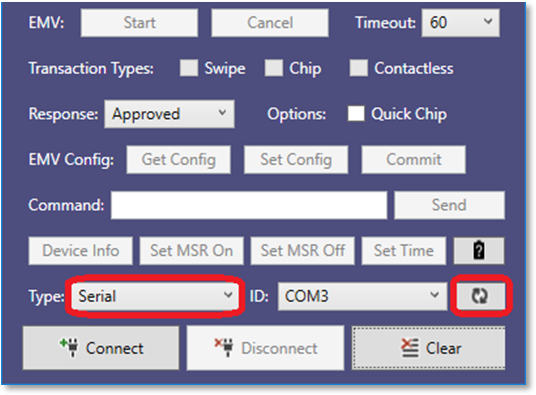
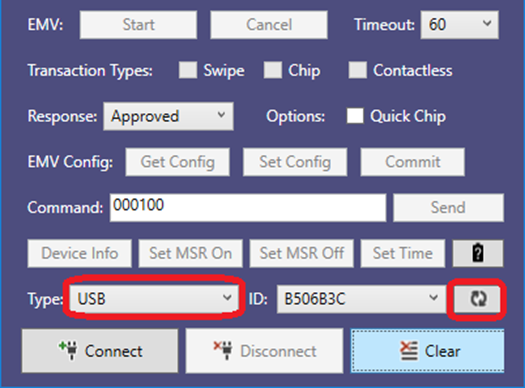
Launch the MTNET Demo, select USB as the device type in the Type list box, and press the Scan button to display a list of available devices.
Microsoft®, Windows® and .NET® are registered trademarks of Microsoft Corporation.
EMV® is a registered trademark in the U.S. and other countries and an unregistered trademark elsewhere. The EMV trademark is owned by EMVCo, LLC. The Contactless Indicator mark, consisting of four graduating arcs, is a trademark owned by and used with permission of EMVCo, LLC.
All other system names and product names are the property of their respective owners.
Table 0.1 - Revisions
Rev Number
Date
Notes
10
January 5, 2017
Initial release
11
May 24, 2018
SOFTWARE LICENSE AGREEMENT
IMPORTANT: YOU SHOULD CAREFULLY READ ALL THE TERMS, CONDITIONS AND RESTRICTIONS OF THIS LICENSE AGREEMENT BEFORE INSTALLING THE SOFTWARE PACKAGE. YOUR INSTALLATION OF THE SOFTWARE PACKAGE PRESUMES YOUR ACCEPTANCE OF THE TERMS, CONDITIONS, AND RESTRICTIONS CONTAINED IN THIS AGREEMENT. IF YOU DO NOT AGREE WITH THESE TERMS, CONDITIONS, AND RESTRICTIONS, PROMPTLY RETURN THE SOFTWARE PACKAGE AND ASSOCIATED DOCUMENTATION TO THE ADDRESS ON THE FRONT PAGE OF THIS DOCUMENT, ATTENTION: CUSTOMER SUPPORT.
MagTek, Incorporated (the "Licensor") owns and has the right to distribute the described software and documentation, collectively referred to as the "Software."
LICENSE: Licensor grants you (the "Licensee") the right to use the Software in conjunction with MagTek products. LICENSEE MAY NOT COPY, MODIFY, OR TRANSFER THE SOFTWARE IN WHOLE OR IN PART EXCEPT AS EXPRESSLY PROVIDED IN THIS AGREEMENT. Licensee
may not decompile, disassemble, or in any other manner attempt to reverse engineer the Software. Licensee shall not tamper with, bypass, or alter any security features of the software or attempt to do so.
TRANSFER: Licensee may not transfer the Software or license to the Software to another party without the prior written authorization of the Licensor. If Licensee transfers the Software without authorization, all rights granted under this Agreement are automatically terminated.
COPYRIGHT: The Software is copyrighted. Licensee may not copy the Software except for archival purposes or to load for execution purposes. All other copies of the Software are in violation of this Agreement.
TERM: This Agreement is in effect as long as Licensee continues the use of the Software. The Licensor also reserves the right to terminate this Agreement if Licensee fails to comply with any of the terms, conditions, or restrictions contained herein. Should Licensor terminate this Agreement due to Licensee's failure to comply, Licensee agrees to return the Software to Licensor. Receipt of returned Software by the Licensor shall mark the termination.
LIMITED WARRANTY: Licensor warrants to the Licensee that the disk(s) or other media on which the Software is recorded are free from defects in material or workmanship under normal use.
THE SOFTWARE IS PROVIDED AS IS. LICENSOR MAKES NO OTHER WARRANTY OF ANY KIND, EITHER EXPRESS OR IMPLIED, INCLUDING, BUT NOT LIMITED TO, THE IMPLIED WARRANTIES OF MERCHANTABILITY AND FITNESS FOR A PARTICULAR PURPOSE.
Because of the diversity of conditions and PC hardware under which the Software may be used, Licensor does not warrant that the Software will meet Licensee specifications or that the operation of the Software will be uninterrupted or free of errors.
IN NO EVENT WILL LICENSOR BE LIABLE FOR ANY DAMAGES, INCLUDING ANY LOST PROFITS, LOST SAVINGS, OR OTHER INCIDENTAL OR CONSEQUENTIAL DAMAGES ARISING OUT OF THE USE, OR INABILITY TO USE, THE SOFTWARE. Licensee's sole remedy in the event of a defect in material or workmanship is expressly limited to replacement of the Software disk(s) if applicable.
GOVERNING LAW: If any provision of this Agreement is found to be unlawful, void, or unenforceable, that provision shall be removed from consideration under this Agreement and will not affect the enforceability of any of the remaining provisions. This Agreement shall be governed by the laws of the State of California and shall inure to the benefit of MagTek, Incorporated, its successors or assigns.
ACKNOWLEDGMENT: LICENSEE ACKNOWLEDGES THAT HE HAS READ THIS AGREEMENT, UNDERSTANDS ALL OF ITS TERMS, CONDITIONS, AND RESTRICTIONS, AND AGREES TO BE BOUND BY THEM. LICENSEE ALSO AGREES THAT THIS AGREEMENT SUPERSEDES ANY AND ALL VERBAL AND WRITTEN COMMUNICATIONS BETWEEN LICENSOR AND LICENSEE OR THEIR ASSIGNS RELATING TO THE SUBJECT MATTER OF THIS AGREEMENT.
QUESTIONS REGARDING THIS AGREEMENT SHOULD BE ADDRESSED IN WRITING TO MAGTEK, INCORPORATED, ATTENTION: CUSTOMER SUPPORT, AT THE ADDRESS LISTED IN THIS DOCUMENT, OR E-MAILED TO SUPPORT@MAGTEK.COM.
Select the Device ID and press the Connect button to open the device.
Swipe a magnetic stripe card to read the card data.
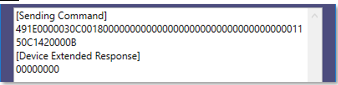
If you want to send a command to the device, enter the command in the command text box and press the Send button.
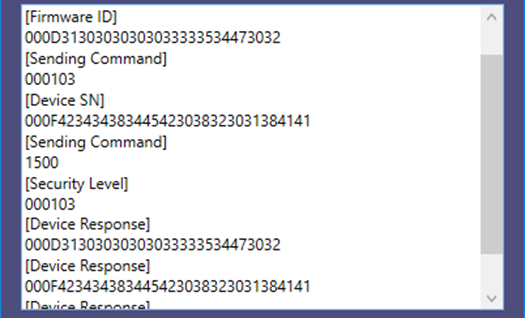
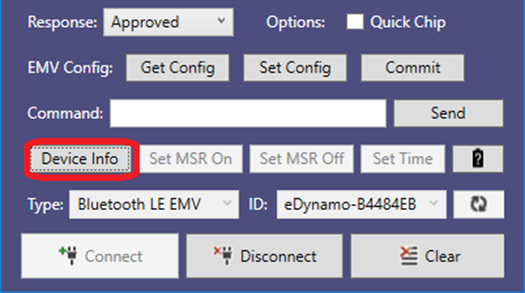
To retrieve device information, press the Device Info button
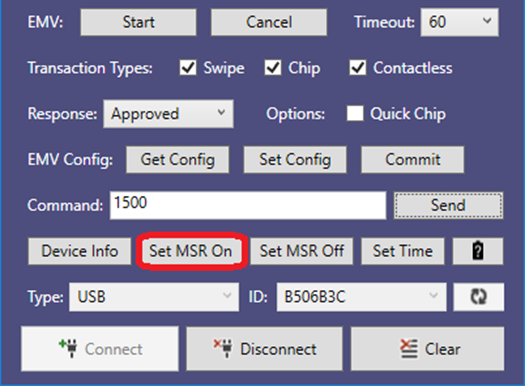
To set the MSR On for the device, press the Set MSR On button.
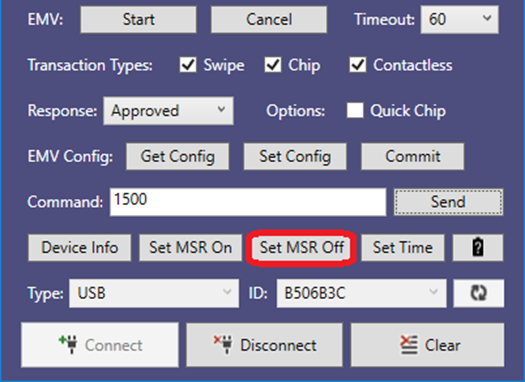
To set the MSR Off for the device, press the SET MSR off button. Device will not send card data after swiping a magnetic stripe card but will during an EMV transaction.
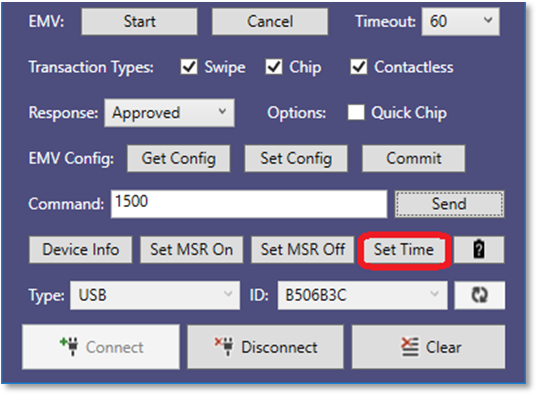
To configure the current PC date and time in devices which require a Date/Time be set after power up, press the Set Time button before performing an EMV transaction.
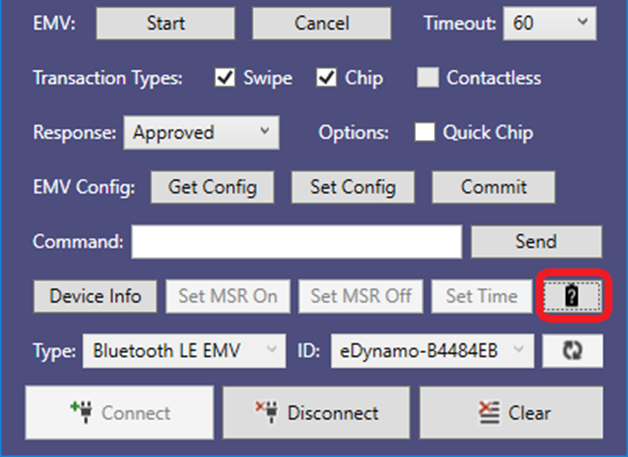
To retrieve the battery level of the device, press the Battery button. Note: When powered by USB, the level returns as 100%.
If you have an EMV device and want to read a chip card, select from the Transaction Types, Response, Options, Timeout, and then press the Start button to begin an EMV transaction
If you want to cancel the EMV transaction, press the only work before the card is presented.
To clear the screen, press the Clear button.
To close the device, press the Disconnect button.
To connect via an interface listed in the Type box follow these steps:
Connect the device to the USB port of the Windows PC.
Launch the MTNET Demo, select USB as the device type in the Type list box, and press the Scan button to display a list of available devices.
Added support for tDynamo and DynaWave.
12
January 30, 2019
Updated to correctly reference Bluetooth LE. Added device feature detection during connection and MSR head power control. Added battery level.
13
November 19, 2020
Added support for iDynamo 6.
14
February 11, 2021
Updated MTNET OEM Demo instructions. Added DynaDip in the supported device list.
100
June 4, 2024
Added iDynamo 5 (Gen III) in the supported device list at section 1.




Pair the device to the Windows PC.
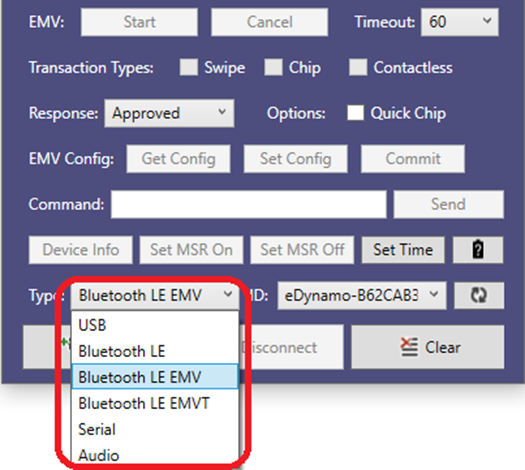
Launch the MTNET Demo and select either Bluetooth LC, Bluetooth LE EMV, or Bluetooth LE EMVT ass the device type in the devices. Type list box, press the Scan button to display a list of available devices.
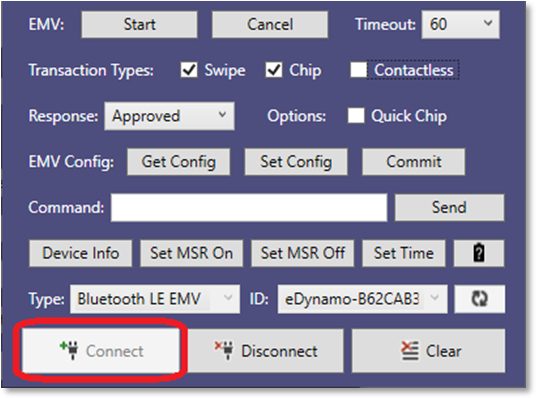
Select the Device ID and press the Connect button to open the device.
Pair the device to the Windows PC.
Launch the MTNET Demo and select Serial button to display type in the Type list box, press the Scan button to display a list of available Ports
Select the Device ID and press the Connect button to open the device.