For the complete documentation index, see llms.txt. This page is also available as Markdown.

Appendix E: Physical Button (DynaFlex Only)

Every DynaFlex device features a single physical button. On the DynaFlex II Go, this button is located on the left side of the device. For all other models, it is located on the bottom of the device near the USB port. Pressing and holding this button can activate additional functions on the device. To active a specific function, press and hold the button until a specific number of beeps are heard. Table G8.7-48 shows which functions can be activated. Beep counts that are not listed are not supported.

Button Functions

2

Power Off

Power the device off, The device will reboot if it is connected to USB.

3

WLAN Setup

WLAN devices only.

4

BLE Pairing

BLE devices only.

5

Demo

See Appendix C for more information.

6

Battery Level

Light the LEDs to indicate the current state of charge of the battery. The LEDs will light for 3 seconds then return to their original state.

The DynaFlex II Go has only green LEDs. Instead of lighting the first LED in amber, it will slowly flash the first LED. Instead of Red, the first LED will flash quickly.

Battery Charge Status

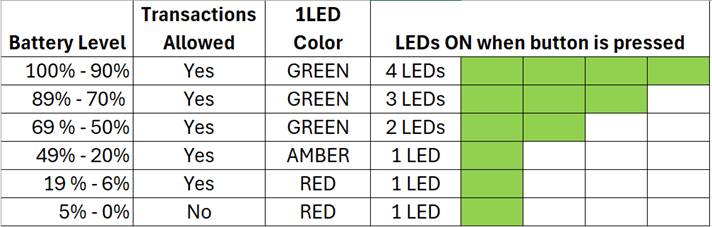
As mentioned in Appendix G Physical Button (DynaFlex Only), there is only one physical button on DynaFlex devices. Pressing and holding this button until the device beeps six times then releasing it causes the LEDs on the front of the device to display the current charge state of the battery. The LEDs will return to their previous state after three seconds.

Battery Charged Example

100% - 90%

Yes

Green

4 LEDs

89% - 70%

Yes

Green

3 LEDs

69% - 50%

Yes

Green

2 LEDs

49% - 20%

Yes

Amber

1 LED

19% - 6%

Yes

Red

1 LED

5% - 0%

No

Red

1 LED

The DynaFlex II Go has only green LEDs. Instead of lighting the first LED in amber, it will slowly flash the first LED. Instead of Red, the first LED will flash quickly

Last updated